Technically, these won’t be ribs, they will be vertebrae, but any bone with meat on it, when properly seasoned and cooked, tastes some good. Just like that monkey. Now, personally, I would prefer to start with a live cow, and after s-laughter-ing it and letting it age for three or four weeks, removing a few ribs to enjoy. Sadly, I have no cow.
Instead, I will start with an 18 pound $115 beef roast. Various roast cuts go by all sorts of different names, and you can’t rely on them being labeled properly, so you have to look for one that has the right shape and configuration to it. If there is someone at the meat store who speaks the same language as you do, you can ask them for assistance. At the stores I go to, there never is, and I don’t speak whatever language it is that they are speaking.
The shrink wrap packaging sometimes gets a tiny whole or tear in it, which lets air in and will spoil the meat. The meat turns bright red in the presence of oxygen, so find another package if the juice does not look dark.
In spite of the fact that this chunk of meat clearly has bones, there is a high visibility orange label on the package that makes a claim to the contrary. One would think that there would be a government agency responsible for making sure that food is properly labeled.
Around here, in New York, they have taken to calling this cut of meat shell of beef or shell steak. Do cows have shells? Perhaps they have never seen a cow before and they are confusing it with a turtle, because turtles have shells. And bones, too, for that matter. I know this cut as striploin, and I verified it with the meat man by drawing pictures and pointing at signs.
Here is the meat with the plastic wrap removed. Usually, I spill the runny juice on the floor, but that step is optional.
By the way, the juice looks red, but it is not blood—it is a mix of water and protein—otherwise it would be thick, clotty, and really gross.
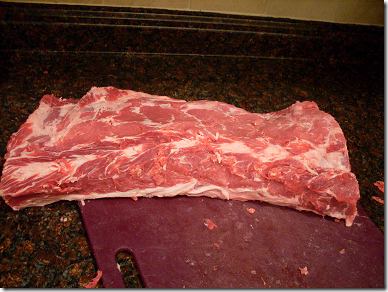
This side would be the outside of the cow. There is a thick layer of fat on it, but at least they removed the leather for me. The muscle in this part of the cow does not get much of a workout, so it is typically quite tender.
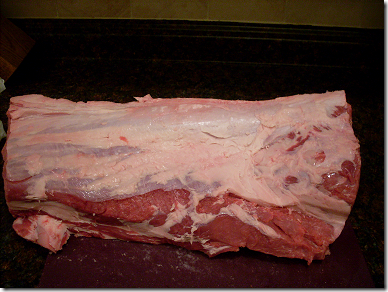
Here is the inside of the cow. The vertebrae are facing down. If you look closely at the end on the left…
…you can see there is a single rib bone attached. If we go any further to the left, which would be closer to the head of the cow, we would get to the prime rib cuts.
Here is an end view of the roast. The inside of the cow is on the right, and the outside is on the left. In relation to a T-bone steak, the wider part of the T is the striploin, and the smaller, narrower part is the tenderloin.
Since there is no tenderloin here, if this meat were cut into steaks with the bones attached, you would end up getting what some places call a wing steak.
The pictures are a bit blurry because it was hard to operate the camera with beef visceral on my hands.
The orange box in the cut chart shows what part of the cow this roast was harvested from. It is from the top section of the left side short loin.
You can see that the tenderloin, which would be on the inside of the cow, narrows towards the front (head) and thickens toward the back (tail) of the cow. When a T-bone steak is cut from a section of the short loin closest to the sirloin, the tenderloin portion will be large, and they call these Porterhouse steaks.
When cut to a decent thickness for a steak, there are only two Porterhouses (Porterhomes?) per side of beef, or four per cow. Sometimes, in the grocery stores, I see Porterhouse steaks cut to less than half an inch thick, which is too thin for searing at high temperature.
At this point, most of the fat has been removed, but I would like to peel off some of the fascia tissue as well. It tends to be tough and chewy, and I like well trimmed meat. Use a very sharp knife and trim away small sections at a time.
In the lower left corner, you can see the end of the rib bone after the fatty parts were removed.
Here is the bag of fat that is leftover, which can be used to make suet and soap, but I like hucking it at random strangers in the street, or leaving chunks of it on the cars that park in front of my driveway. I am not a good person.
With all of the sketchy bits peeled off, it is starting to look pretty good. The next thing that needs to be done is to remove the bones of the vertebrae from the striploin.
Doing so requires a long sharp knife. Unfortunately, I do not have a proper boning knife, but I keep my knives razor sharp so that I can perform emergency surgery with them.
Starting with the backbone side, slide the knife between the bones and the meat, being careful to keep the knife straight and as close to the bone as possible.
Then, flip the whole thing over and slice the meat away from the bone on the other side. The bone will not separate and pull away, yet, because there is a weird little angled section between the two sides, and it is a bit tricky to cut around.
Start at one end and gently pull the meat away from the bone, slicing carefully along the spine. With enough cutting and gouging, cursing and swearing, the meat will separate and detach.
 Now we have what we wanted all along: a chunk of meaty ribs that we can cook and eat.
You could cook the bones all connected to one another, but I usually split them apart to make them easier to deal with.
To separate the bones, first cut the connective tissue between them on both sides.
 The bones are shaped irregularly, so it requires a bit of poking around with the knife to find the softer parts to cut.
Once the soft stuff has been cut, the bones can be pulled apart. It takes more of a twisting and pulling motion rather than bending to get the joints to split from one another. If they are especially difficult, you may need to do some more cutting.
After they are all separated, put them in a large pot.
Pour half a bottle (or more) of good barbecue sauce on them, and then add enough water to cover them without overfilling the pot.
I would never boil pork ribs. Those I usually wrap in foil and cook in a slow oven for the afternoon, but cow connective tissue is tougher than pig, and the ribs have to be well submerged in boiling fluid for them to get tender enough to eat. Cover and bring to a boil, reduce heat and simmer for about an hour to 90 minutes, poking and rearranging them from time to time to ensure they are all cooking well.
Remove the cover and continue simmering for another 30-45 minutes, or until the meat comes away from the bones without a hacksaw. Transfer the ribs to an oven safe dish and put them in a 220 degree F oven. Crank up the heat on the sauce that remains in the pot and boil and stir until it is reduced and gets thick and sauce like.
Remove the ribs from the oven and spoon all of the sauce all over them. Return them to the oven for about 15 minutes.
When you are done, they will look like these, or not. Maybe. Or, possibly.
They will taste really good, though, unless you used a particularly nasty flavor of barbecue sauce.
Now, all that is left is to figure out what to do with the extra meat that we removed from the ribs
I suppose you could throw it away, or feed it to your dog, but tossing it in the garbage seems a little wasteful, and I don’t have a dog.
Another possibility would be to slice the striploin into steaks that are a bit more than an inch thick. I use my first two fingers (the peace fingers) as a gauge and start cutting from the left side since I am right handed and do not wish to cut off my fingers.
These, then, will be striploin steaks, often called NY sirloin, but never Mr. Loin.
Repeat the slicing, keeping the knife straight and parallel with the previous cut. It takes a bit of practice to get them even and consistently thick. If you press too hard on the knife, the meat compresses when it is cut and will result in it being oddly thin on one end.
The result, here, is 14 striploin steaks suitable for cooking and eating.
These certainly do not look like the sad thin excuses for steak that you find at most supermarkets.
The final yield was a little over 9 pounds of striploin steak. I kept two steaks out for dinner and packed the remainder in freezer bags to store in the freezer.
Here they are. About 10 ounces each.
After grinding sea salt and fresh pepper on both sides, I coat them with a bit of Italian dressing as a marinade.
I heat a cast iron pan until it looks like it will burst into flames. There is no oil in the pan, and it is just starting to smoke.
Once the pan is sufficiently hot, the steaks are tossed in. They make a nice sizzling noise.
The smoke fills the house. If only the kitchen had some sort of ventilation.
They cook for 3 and 1/2 minutes and then they are turned over.
The steaks are removed from the pan, and placed on a plate or cutting board such that the side that was most recently on the heat is up. Doing so prevents that side from cooling too quickly by transferring all of its recently acquired heat to the surface.
The steaks are immediately covered with foil and allowed to rest for 5-10 minutes. I usually eat my salad while I wait.
When cooked correctly, this is what they will look like on the inside—perfect and juicy.
Add a baked potato covered in butter, S & P, cheese, sour cream, and green onion and you have one delicious meal.
Plus, I have nearly three pounds of fat to spread around town.
Well, there it is. An 18 pound roast yields 9 pounds of steak, almost 3 pounds of fat, and about 6 pounds of ribs.
-DG.


Mmmmmmmmmmmmm. That looks soooooo good, Doug!!! It’s times like this that
I miss you, little brother.
Ditto.
That does look quite delicious. I’m going to have to learn how to do all those cuts…